Monday, August 29, 2011

Step Right Up! Clown Bonnets for sale! One week only!


Morning!  I don’t sell many finished items but I have had a few requests for clown bonnets recently.  {{Umm and really I hate to pat myself but man alive are they so adorable...or maybe it's the super cute kids that are helping but either way.....}}  I also want to make Dex one for Halloween so timing is pretty perfect!  I am going to open up orders for them for a limited time.  Orders will be accepted through September 2.   

If you’d like to order one please head over to my website INNER HOOKER

I will order the yarn September 3 and as soon as it comes in I will get busy on them!  Orders will take approx. 3-4 weeks (depending on yarn shipment).  As soon as yours is complete it will ship.  Orders will be worked in the order payment is received.  If you’d prefer a particular color for the bonnet or the hair please include this in the notes to seller when checking out in paypal.  If you don’t request a particular bonnet color it will be chosen at my discretion.  The hair color will include all colors in the typical ROYGBV pattern unless otherwise requested.


If you have any questions please email me at innerhooker@hotmail.com


Go get yours now! INNER HOOKER

Thanks so much!

Friday, August 26, 2011

Crochet Along Week 1


Welcome to the FIRST (but hopefully not the last) Crochet Along!!!  
I am so super excited to get started on this!  We are going to start and complete an adult size afghan (approximately 50" by 70", 88 grannies total, 8 squares x 11 squares) in 8-10 weeks.  Hefty goal?  Maybe!  We will take it a week at a time and adjust if we need to!  This will put us completing this early November!  Just in time for things to get crazy for the holidays.  Perhaps this could be one of your handmade gifts!

I’d love for you to invite your friends and family to join along as well!  If you are participating and have a blog feel free to take a button!  You may also want to follow me on facebook!  I will check in with you all throughout the week to see how things are progressing (too slow/too fast, etc).  

I am so happy you are joining me on this.  Please know this is my first time hosting a crochet along and my first granny square afghan.  We may hit a few bumps along the way but I look forward to this being good!  Now, let’s grab a beverage, sit down and get started {you can pretend we are all chatting in cozy chairs at some totally groovy coffee shop, I totally am!}

I prefer to work my grannies in more of an assembly line.  You can choose to do them however you’d like but I’ll be doing mine a one round per week.  You may prefer to do your grannies start to finish, one at a time (you’ll need to complete about 11-12 a week)  {sidenote:  I love working them in groups so I have a handful at some stage or another {truly for no other reason than they look pretty all stacked up!} but being my first time it was confusing to figure a good schedule and keeping the week’s work pretty even throughout.  Maybe the next one we’ll do this way!  Again, if you prefer you could do it this way.}  Bottom line you want your granny to grow a round a week so if you want to do half your group at a time you’ll work 44 grannies and do twice as many rounds per week and start over with your next group of grannies half way through.  Confused yet???   I shouldn’t type my thoughts out loud I confuse myself!  

Back to what I was saying…we will do one round per week.  The first week we are going to work through Round 2 on as many as possible.  Whatever we don’t finish will carry over to week 2 and so on.  This predictable schedule makes it easy enough to catch up if you fall behind on a busy week or go ahead if you have more time one week than another.  We will check in once a week, if you blog I'll post an area here to link up.  If not we can post on Flikr, Facebook or whatever idea you may have.  Let me know your thoughts on this.

Oh and did I mention we are doing the Sunburst Granny??


{pics found via pinterest you can find original credits and links on this blog}

isn't she purdy!

Week 1:
 Download the pattern.  Gather your supplies.  Before getting started I recommend making 1 granny from start to finish.  Check your gauge!  {trust me on this, I have no clue what I was thinking and checked it after about 40 circles...yeah WAY TOO TINY}  The finished granny also serves as a good reference for color changes and such.

You are going to need yarn….lots of yarn!  You may choose to use all stash yarn or go out and buy all coordinating or your colors of choice.  If I have done my math right (and I like to think I have) this project will take just under 3,000 yards…YES INSANE RIGHT!?!?  NOT including the yarn for joining {because I honestly have no clue how much that will take}.  My practice granny took about 35 yards.

Week 1:  make 88 grannies through Round 2

Week 2:  work all through Round 3
Week 3:  work all through Round 4
Week 4:  work all through Round 5
Week 5:  work all through Round 6
Week 6:  work all through Round 7
Week 7:   Round 8 & 9 dependent on size
Weeks 8-9:  finish any squares not complete and join


Now go get busy!!!  You have 88 circles through round 2 to complete!  Please leave any questions or feedback in the comments here and I'll get back with you!

Thursday, August 25, 2011

Giveaway Winners?? Was it you?

I haven't heard from a few of you yet!  Please go see if you won!  If you did please email me at innerhooker@hotmail so we can coordinate the prizes!  

Thanks again!

Wednesday, August 24, 2011

Final Day!!

The final day is over!

Thank you to our vendors Taylor, Natasha, Samantha and Andrea for sponsoring today's prizes. If you didn't win you can always still shop! You will not be disappointed I can assure you!

In case you need a reminder...here is the loot!

$45 shop credit to Taylor'd 2 U (website and Facebook)
a frog lovie from Looped with Love (Etsy and Facebook)
a hand crocheted mermaid set photo prop from EvryDayThreads (Etsy and Facebook)
$25 to Doodies Booties (Etsy and Facebook)

and the winner is...........

Jacquelyn Foreman said...

Tweeted!

Congrats!!! Now if you didn't win don't hate on me, hate on random.org and then go buy yourself something so you can feel better :)

Thanks again everyone!

Day 6 Winner!

Day 6 of the giveaway is closed!

Thank you to our vendors Sarah, Holly, Alessandra and Jo Lynn for sponsoring today's prizes. If you didn't win you can always still shop! You will not be disappointed I can assure you!

In case you need a reminder...here is the loot!

hand sewn crochet organizer from Sarah's Stitches (website and Facebook)
fabric applique from Holly's Crafts (website and Facebook)
a copy of Just Be Happy from Just Be Happy Crochet (Etsy and Facebook)
stitch markers from Snips, Snails and Polka Dots (Etsy and Facebook)

and the winner is...........


Angela @ A Mama's Two Cents Worth... said...
I like all the vendors....
Angela


Congrats!!! Now if you didn't win don't hate on me, hate on random.org and then go buy yourself something so you can feel better :)

Thanks again everyone!

Monday, August 22, 2011

Crochet Along


I have been totally obsessed with grannies lately!  No, not real grannies though I do love old people.  Granny squares, it seems they are everywhere I look!  Maybe they are popular again?  Maybe I notice them because I am obsessed with them?  Either way I have been attempting to convince myself to start and can’t seem to take the leap…sort of like starting a diet.  I decided to see if anyone else would be interested in joining along.  Each week or 2 weeks (we can vote on how often) we will have an assignment or goal then we will check in with each other and post pictures and all that good stuff.  You know…hold each other accountable and actually finish this project! 

Since we will be doing it together I thought we’d take a vote and see what everyone liked best.  Of course we can’t please every one so if you’d prefer another of course that is fine, you will just need to adjust your goals accordingly.   All of the options below are free patterns.  I don’t want anyone to not participate because of cost.  I am also hoping to use up stash yarn but we’ll see!

Option 1
Sunburst Granny

Sunburst Pattern
These pictures are examples.  You can click the picture to be taken to the source. 

Option 2
Hexagon Granny

Hexagon Pattern
These pictures are examples.  You can click the picture to be taken to the source.  


#3 Summer Garden Granny


Summer Garden Pattern
Pattern can be found here.
All pictures were found here.

Of course I am in love with a million more but I think these 3 are great choices!  
If you'd like to join in on the crochet along please head over to fb to vote for your favorite.


Inner Hooker on Facebook

Please feel free to leave your vote here as well or any opinions, feedback, etc...

Friday, August 19, 2011

Day 5 Winner!

Day 5 of the giveaway is closed!

Thank you to our vendors Erika, Kristie, Brittni, and Shelley for sponsoring today's prizes. If you didn't win you can always still shop! You will not be disappointed I can assure you!

In case you need a reminder...here is the loot!

$25 shop credit to For Your Little One (Facebook)
2 custom headbands to Little Pink Boutique (blog and Facebook)
custom newborn pixie from The Swanky Peacock  (Facebook)
newborn kermit hat from Crafty Girls of Avon (website and Facebook)

and the winner is...........


Leanne :) said...


Left a note on all facebook pages! :)


Congrats!!! Now if you didn't win don't hate on me, hate on random.org and then go buy yourself something so you can feel better :)

don't forget you can still enter days 6 & 7!!

Thanks again everyone!


Freezer Cooking Take 1

“What’s for dinner” 
oh lawdy do I hate this question!! It makes me feel like a crazy ready to rage woman. Enter freezer cooking. In an effort to avoid this internal meltdown and have better odds of my children surviving into adulthood I thought I would give this notion a go. There are some seriously hard core people out there that literally cook once a month and make/prep most of their meals. Well, I’ll never be that girl but I wouldn’t mind having 2 dozen or so meals prepped in the freezer.

There are countless websites, blogs, and cookbooks dedicated to this. I just want to share a few recipes that are tried and true. It’s a little nerve wracking making things that you don’t know how they’ll save and taste later! I knew I should start small just in case it wasn’t my thing we hadn’t invested too much time or money into it! I chose to make 2-3 meals of 3 different dinners. At this point I have used these frozen meals and they all passed the test! Well, one wasn’t a favorite here only because Chris hates tomatoes….oops {I knew he hated them but thought they were small enough he wouldn’t mind. Next time I will throw them in the food processor along with the onion and bell peppers I hid in this dish}


My meatloaf recipe. Do not cook ahead or mix the sauce. Do that as you would when cooking. I prepped it all and put it in a disposable pan to freeze. Eventually I think I’d like pyrex for them all. I also saw something were they lined the pan with saran wrap, froze it solid and then took it out and put it in a bag. Takes up much less space in the freezer and budget friendly. Maybe I’ll try this next time!


Baked Ziti from Annie’s Eats. I did cook the turkey ahead and I also cooked the noodles a little more than half done. This one I prepped all the way to the cooking stage and froze (again in disposable pans) instead of baked. This one is awesome!  


Creole Jambalaya from Keeping Life Creative. Cooked the chicken and the sausage. Cooked the rice about halfway. I also put the veggies in the food processor in hopes of hiding it from the kids. This dish turned out to be a little too spicy for them anyways. I thought it was delish but considering I was the only one that ate it , it won’t make it into rotation. I do have another frozen bag of it I guess I’ll be eating alone. I poured this into 2 large Ziploc freezer bags and layed perfectly flat to freeze. Once they were frozen solid I could stand them up and they took up next to no room. Loved it.

I also put one large pack of chicken in the crock pot and shredded that into separate bags to freeze. Sliced another one into fajita strips, poured in the marinade and froze. We typically have shredded meat in the freeze.  When I make it for dinner I am sure to make enough extra for another meal...we love shredded meats! They are so easy to cook and tasty! Plus you can use them for lots of things! My go to recipe is this one from Make It and Love It

 We’ve made it dozens and dozens of times always perfect!

That's about it!  Wish I had tons more to share but like I said, these are ones that I have not only frozen but already tasted after the big freeze.  I'll keep you posted on more.  If you are feeling even a teensy bit tempted I really recommend trying a few meals!  It has made a few of my evenings much easier not to mention saving time and money!


Thursday, August 18, 2011

Flip Flop Refashion DIY


Flip Flop Refashion


Did you see this flip flop makeover??  
Cute right?  

Well, I have the Target version 
(LOVES them, too bad they are sitting in the yard with dog poop on them...need to go spray them off...maybe later)

Since then I have seen a few flip flop makeovers and thought they were pretty cute and clever.  Me being the hooker that I am I NEEDED a yarn version.  

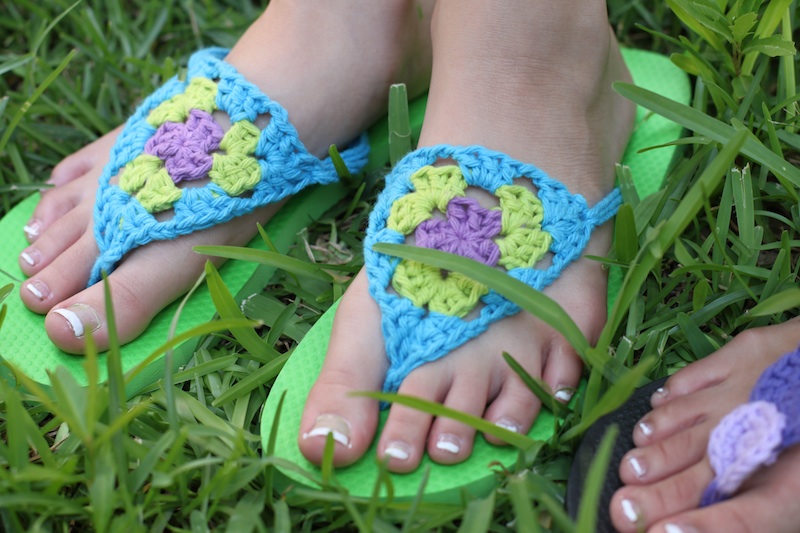
Behold!  The granny triangle flip flop diy {yeah, that's a mouthful} 

I used an I hook (5.50mm) and cotton worsted weight yarn.  Feel free to use whatever you'd like!  
We bought 3 pairs of Old Navy cheapies for about $8 they do have dollar day but it's crazy.  My daughter got the "high end" ones...you know the ones that are $3 weird toxic rubber instead of $2 weird toxic foam :)  


 Let's get started.

Make a magic circle.

Ch 3 (counts as your first dc) and 2 dc in the magic circle, ch 2 (sorry chain 2 not pictured)

(dc, dc, dc, ch 2)—repeat twice.  You should now have 3 groups of 3 dc, join to the top of your starting chain.

{2 groups}
 your piece should resemble this  {3 groups}


Optional color change

Ch 3, 2 dc in the chain space just before your chain (the last chain space of the previous round), ch 2,


In the next chain space make 3 dc, ch 2, 3 dc, ch 2

{sorry ch 2 not pictured...again ;) }


In final chain space you should have 1 group of 3dc already.  You are going to make 3 dc, ch 2, and then join into the starting chain.  You now have 6 groups of 3 dc


Optional color change

Ch 3, 2dc in the chain space just under/behind your chain, ch 2

3dc, ch 2 in next space –this space is the center of one of the sides of your triangle


3dc, ch 2, 3dc, ch 2 in next chain space—this space is a corner of your triangle

3dc, ch 2 in next space –this space is the center of one of the sides of your triangle

3dc, ch 2, 3dc, ch 2 in next chain space—this space is a corner of your triangle

3dc, ch 2 in next space –this space is the center of one of the sides of your triangle

You are now at the end, your space should have your very first group of dc, make 3 more, ch 2 and join to beginning chain.

Fasten off, weave in all tails

I pulled a few strands of yarn through, you could braid them or finish some other way but I thought it looked fine just loose.

Cut your plastic straps off.  You can use your straps as a size gauge or try them on. Pull your yarn through and knot.  Don't pull your yarn knot tight until you've got a good fit.  Do this on all 3.

Squeeze some hot glue in the hole and let dry well.  I also sort of wrap/stuff the extra yarn in the hole.  You want it smooth with the bottom or close so that it doesn't feel like you are walking on bumps :)

Tada!!!  Cutesy Tutesy!

You could also do circles arranged in a million different ways {my daughter chose this one}

flowers, or even yarn knotted like the fabric ones.  I have 1 more pair and I am pretty sure they'll become flowers!


Thanks girls for not only modeling the flip flops but for even painting your nails!

Hope you enjoy!